 Resurface your deck with Trex decking
Posted on Thursday, February 15, 2018
Categories:
Decking & Railing
Before you waste hours of precious outdoor living enjoyment with your family because you are – yet again – sanding, staining and sealing your old worn wooden deck, give serious consideration to resurfacing your old deck with Trex Composite Decking. As long as the deck framing substructure is sound, you can simply replace the decking and railing.
Resurfacing a deck is about 1/3 the cost of replacing the entire deck and will bring decades of long-lasting, low-maintenance beauty and enjoyment to your home. The days of pulling splinters from the feet of kids and pets will be over!
Everything undesirable that a wood deck is known to do (warp, crack, splinter, rot, twist, and be devoured by termites), a Trex deck is guaranteed not to do. In fact, Trex has a 25-Year limited residential warranty against material defects, fading and staining. So, if you are ready to spend your time relaxing on your deck rather than working on it, let’s get started.
INSPECT, REPAIR, AND REINFORCE THE FRAME

The most import steps to resurfacing your deck come long before the new decking ever touches the framing. Carefully inspect the framing structure of your deck. Repair, reinforce and / or replace framing and fasteners as required:
- Make sure that the floor joist are no more than 16” on center for running the decking perpendicular to the joist, and no more than 12” on center for running the decking on a diagonal.
- Replace any corroded fasteners, hangers, or loose bolts or nails.
- Ensure that the required gauge and length nails, and proper number of nails are securing each joist hanger. If someone used roofing nails to install your hangers, they will fail! Consult the Simpson Strong-Tie Deck Center to properly secure or replace your hangers before going any further!
- Replace any badly rotted wood.
- Check the top edge of each floor joist for warping or crowning. You may need to shave the top edges with a planer and / or install shims in order to make them flat and level with one another. Extreme irregularities in floor joist that are not corrected now will show as bumps or waves in the decking after it’s installed!

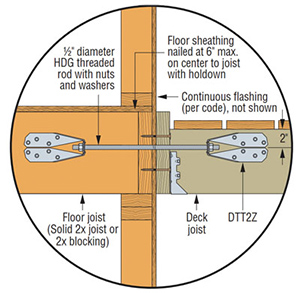
- Bring your deck up to code by installing new fasteners where required, especially in properly securing the ledger board to your house. The vast majority of deck collapses happen when the ledger pulls away from the house due to improper fastening. Visit the Simpson Strong-Tie Deck Center to learn which fasteners are required for your application. The DTT2Z Deck Tension Tie connector is an excellent choice for securing both the ledger and new deck posts to ensure ultimate strength and safety.
- Install additional blocking between joists where required in order to provide ample support for the new railing posts and to strengthen the overall structure.
- Install Trex Protect Joist and Beam Tape on top of your joist, beams, and stair stringers prior to installing new decking. This will seal the tops of the boards protecting them from additional moisture permeation, helping screws hold longer and stronger, reducing the risk of rot and mold, and eliminating freeze / thaw splitting.
Now you are ready to install your new Trex decking and railing with confidence! Follow the Trex installation instructions and enjoy years of outdoor-living comfort relaxing on your deck.
Tagged:replacement, decking, outdoor living, home improvement, remodel, resurfacing, reinforcing